2014年2月24日月曜日

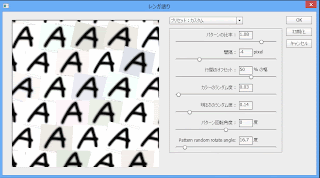
PhotoshopCC : レンガ塗りの改造とか


PhotoshopCCには塗りつぶしパターンに、
スクリプトが使えるようになった。

レンガのスクリプトがあったのだけど
ランダムの回転が無かったので足してみた。

本当はタイルパターンに対応させてみたかったのだけど、
色の変化は、ランダムに付けられるので、ちょっと見送り。

感触としては悪くないかも


ソース

///////////////////////////////////////////////////////////////////////////////////////////////////////////////////////////////////////////////////////////
// Here are a few parameters that you can change to modify the behavior of the patterm
// Feel free to modify the values, don't change the variable names

modelParameters = {
    // scaling of the input pattern
    patternScale : 1,
    
    // Offset between rows of pattern expressed in percent of pattern width. 
    // For example 50% is half the width.
    offset : 50,    // use a value between 0 and 100. The default is 50.

    // Spacing between patterns in pixels. 
    // For example,1 creates 1 pixel gap between patterns
    spacing : 0,    // use a value between -10 to 20. The default is 0.

    // Variation of color of the pattern. 
    // For example, value of 0.2 means that each of the red, green, and blue color components
    // will be multiplied by a DIFFERENT random value from interval 0.8 and 1.2. 
    // Set to 0 if you do not want to modify the pattern color.
    colorRandomness : 0.05,    // use a value between 0 and 1. The default is 0.05.

    // Variation of pattern brightness. 
    // For example, value of 0.6 means that each of the red, green, and blue color components
    // will be multiplied by THE SAME random value from interval 0.4 and 1.6. 
    // Set to 0 if you do not want to modify the pattern brightness.
    brightnessRandomness : 0.1,   // use a value between 0 and 1. The default is 0.1.

    // Rotation of individual patterns.
    rotateAngle : 0, // Use a value between -180 and 180. The default is 0.
    
    //Rotate Randmaize
    rotateAngleRandomness : 0
}

///////////////////////////////////////////////////////////////////////////////////////////////////////////////////////////////////////////////////////////
// You can modify the code below but keep in mind that as with any scripting
// you can break things. Keep a backup copy.
///////////////////////////////////////////////////////////////////////////////////////////////////////////////////////////////////////////////////////////


// Get pattern and its size
var pattern = RenderAPI.getParameter(kpsPattern)
var patternSize = pattern.getParameter(kpsSize)
var patternSizeForDialog = Math.max (patternSize.x, patternSize.y) 


function run (api, parameters, scale)
{
    // get the size of the output area  
    var outputSize = api.getParameter(kpsSize)
    // get the location of the top left corner of the bounding rectangle around the selected area
    var outputOrigin = api.getParameter(kpsOrigin)

    var patternSize = pattern.getParameter(kpsSize)
    patternSize *= parameters.patternScale
   
    // to finetune the progress bar, specify how many pixels are covered by patterns - the bigger the spacing the lower the value, for example
    api.setParameter(kpsPixelCoverage, 0.5 * (patternSize.x * patternSize.y) / ((patternSize.x + parameters.spacing) * (patternSize.y + parameters.spacing ) ) )
    
    // compute the pattern size in x and y after rotation
    var rotSizeX = patternSize.x * Math.abs( Math.cos(parameters.rotateAngle / 180.0 * Math.PI)) +  patternSize.y * Math.abs( Math.sin(parameters.rotateAngle / 180.0 * Math.PI))
    var rotSizeY = patternSize.x * Math.abs( Math.sin(parameters.rotateAngle / 180.0 * Math.PI)) +  patternSize.y * Math.abs( Math.cos(parameters.rotateAngle / 180.0 * Math.PI))
    
    // possibly add spacing
    if (patternSize.x + parameters.spacing >= Math.min (5, patternSize.x) )
        patternSize.x += parameters.spacing
    else
        patternSize.x = Math.min (5, patternSize.x)
        
     if (patternSize.y + parameters.spacing >= Math.min (5, patternSize.y))
        patternSize.y += parameters.spacing
    else
        patternSize.y = Math.min (5, patternSize.y)

    // scale up if the patternsize is 1 to avoid long loop
    if (patternSize.x == 1 && patternSize.y == 1)
    {
        if (scale == 1)
        scale = 20
     }

    patternSize *= scale
    //patternSize *= 2

    api.translateRel (patternSize.x/2, patternSize.y/2)
 
    // negative origin may happen for preview of very small documents
    if (outputOrigin.x < 0)
        outputOrigin.x = 0
    if (outputOrigin.y < 0)
        outputOrigin.y = 0
    
    api.translateRel ( -(outputOrigin.x % patternSize.x), -(outputOrigin.y % patternSize.y))

    var row = Math.floor( outputOrigin.y / patternSize.y ) 
    var column = Math.floor( outputOrigin.x / patternSize.x )
    var extraRows = 0            // on each side, if needed
    var extraColumns = 0
    if (parameters.rotateAngle != 0 || parameters.spacing < 0)
    {
        // start a few rows or columns earlier because the tips of rotated patterns may show up in the selection 
        // or because the spacing is negative and transparent patterns to the left would still show up
        extraRows = Math.floor (rotSizeY / (2 * patternSize.y) + 0.4999)
        extraColumns = Math.floor (rotSizeX / (2 * patternSize.x) + 0.4999)
        
        row -= extraRows;
        column -= extraColumns;
        api.translateRel ( -patternSize.x * extraColumns, -patternSize.y * extraRows)
    }

    pattern.setParameter (kpsColorBlendMode, kpsBlendMultiply)
    //pattern.setParameter (kpsColorBlendMode, kpsBlendLinearLight)
    
    //Add Trea patern BlendMode
    //RenderAPI.setParameter(kpsUseOpenGL, 0)
    //pattern.setParameter(kpsPatternBlendMode,kpsBlendLighterColor)
    //pattern.setParameter(kpsPatternBlendMode,kpsBlendDarkerColor)

    //var margin_y = Math.max(patternSize.y, -parameters.spacing)
    var margin_y = patternSize.y + 2 * extraRows * patternSize.y
        
    for (var y = 0; y < outputSize.y + margin_y;  y+= patternSize.y, row++)
    {
        api.pushMatrix()
        
        var x = 0
        
        
        //if ( (row%2) == 1)
        {
            var shift = parameters.offset*0.01 * row
            api.translateRel( ((shift - Math.floor(shift)) - 1)* patternSize.x, 0)
             x = - patternSize.x // one extra, just in case
        }
       
        //var margin_x = Math.max(patternSize.x * (1 + parameters.offset*0.01), -parameters.spacing)
        var margin_x = patternSize.x + 2 * extraColumns * patternSize.x
            
        for (var c = column; x < outputSize.x + margin_x;  x+= patternSize.x, c ++)
        {           
            api.pushMatrix()
            
            // Set the seed based on the current row and column - this assures that the color will be modified
            // in the same way for the pattern in the neighboring selected area
            var seed =  (row * 214013+ c * 2531011) % 0x7fffffff // 
            //Engine.rand(seed)
            //Engine.rand(); // it helps to call rand a few times beforor using it since we are forcing the seed.

            var rc = parameters.colorRandomness  // color randomness
            var br = 1 - parameters.brightnessRandomness + Engine.rand(seed) * parameters.brightnessRandomness*2  // brightness
            api.Color (kFillColor, br *(1 - rc + Engine.rand()*rc*2), br*(1 - rc + Engine.rand()*rc*2), br*(1 - rc + Engine.rand()*rc*2))
             
            //api.scale(rand()*0.1 + 1)
            //api.rotate(-4 + Math.floor(rand()*60) / 7.5)  // 60 distinct rotations - to help cache
            //api.rotate (Math.floor(rand()*10) * 18)
            api.rotate (parameters.rotateAngle)
            
            //追加
            api.rotate (parameters.rotateAngleRandomness * Engine.rand() )
            
            api.scale(scale)
            api.scale(parameters.patternScale)
            pattern.render(api)
            
            api.popMatrix()
            api.translateRel(patternSize.x, 0)
            
            if (restart)
                return;
        }

        api.popMatrix()
        api.translateRel(0, patternSize.y)
    }
}

/////////////////////////////////////////////////////////////////////////////////////////////////////////////////////////////////////////////////////////////////////
// Menu start
// If you want to create a menu in which you change some of the script parameters, include the following code:
// For shipped scripts we can include localized strings, prefixed with $$$/ - call method localize(string) on the prefixed string
// For your own strings, you can query app.locale and select several language versions (for example, your native language and english). Try alert ("Language is: " + app.locale)

var decoMenu = {    //  an object that defines the menu
   menuTitle : localize("$$$/DecoScripts/BrickFill/BrickFill=Brick Fill"),
   menuBackground : [0.93, 0.93, 0.93, 1],
   previewBackground : [1, 1, 1, 1],
   panels : [
    { panelName : "", 
       leftColumnWidth : 180,
       unitsWidth : 65, 
       editTextWidth : 37, 
       panelMenu : [
        { itemName : localize("$$$/DecoScripts/PatternScale=Pattern Scale:") ,  
             itemUnit :  "", itemType : 'slider', itemValue : modelParameters.patternScale, itemMin : 0.1, itemMax : 1.25, itemStep : 0.01, varName : 'patternScale'  }, 
        { itemName : localize("$$$/DecoScripts/BrickFill/Spacing=Spacing:"),  
             itemUnit : localize("$$$/DecoScripts/Units/pixels=pixels"), 
             itemType : 'slider', itemValue : modelParameters.spacing, itemMin : -patternSizeForDialog+1, itemMax : Math.max(100, 3 * patternSizeForDialog), itemStep : 1, varName : 'spacing'  },
         
         { itemName : localize("$$$/DecoScripts/BrickFill/Offset=Offset between rows:") ,
             itemUnit : localize("$$$/DecoScripts/Units/percentOfWidth=% of width"),  
             itemType : 'slider', itemValue : modelParameters.offset, itemMin : -100, itemMax : 100, itemStep : 0.1, varName : 'offset'  }, 
         
         { itemName : localize("$$$/DecoScripts/ColorRandomness=Color randomness:"),  
             itemUnit : "",  itemType : 'slider', itemValue : modelParameters.colorRandomness, itemMin : 0, itemMax : 1, itemStep : 0.01, varName : 'colorRandomness'  }, 
         
          { itemName : localize("$$$/DecoScripts/BrightnessRandomness=Brightness randomness:"),  
             itemUnit : "",  itemType : 'slider' , itemValue : modelParameters.brightnessRandomness, itemMin : 0, itemMax : 1, itemStep : 0.01, varName : 'brightnessRandomness'  }, 
         
        { itemName : localize("$$$/DecoScripts/BrickFill/rotateAngle=Pattern rotate angle:"),  
             itemUnit : localize("$$$/DecoScripts/Units/degrees=degrees"),  
             itemType : 'slider', itemValue : modelParameters.rotateAngle, itemMin : -180, itemMax : 180, itemStep : 1, varName : 'rotateAngle'  }
         
         //追加
         ,
        { itemName : localize("$$$/DecoScripts/BrickFill/rotateAngleRandomness=Pattern random rotate angle:"),  
             itemUnit : localize("$$$/DecoScripts/Units/degrees=degrees"),  
             itemType : 'slider', itemValue : modelParameters.rotateAngleRandomness, itemMin : 0, itemMax : 180, itemStep : 0.1, varName : 'rotateAngleRandomness'  }
         
         //追加おわり
       
       ] }
   ]  // end of panels
 }; // end of menu

// If livePreview is set to 1, the preview image is updated live. Note that due to limitations of scripted menus the update is slow and the flickering may be disturbing. 
livePreview = 0 // recommended value is 0

// Call Photoshop Script that creates the menu
Engine.evalFile ("_Deco Menu.jsx") 

// Menu finished
/////////////////////////////////////////////////////////////////////////////////////////////////////////////////////////////////////////////////////////////////////

if (typeof skipRun == 'undefined' || !skipRun)  // run unles we exited the preview window without pressing a button
    run(RenderAPI, modelParameters, 1)


気づいた事


・マスクが使えない(重なり合う所はNG)
2014年2月20日木曜日

Softimage Plugin : PyQtForXSI : PyQtForSoftimage バイナリ

PyQtForSoftimage バイナリ

OyagさんがPyQtをXSI7.01でも動くようにしたみたい :p
インストールでも簡単みたいです。

よかよか〜


余談

ちなみに、自分も動くようにはなったのですが、
Qt自体の習得に時間がかかりそうなので
もうちょっと基本的なところから始めてます

現在はWACOMタブレットの
サンプルソースを解析中です。

コレが、Cの古文で書いてあって
(20年前からのソース)

関数宣言が昔のだったり。
16bit 32bitのオプションのポインタがついてたりで、
解読が、非常に難解だったりします。

5行/日 位のペースだったり orz

まあ、タブレット、2Dツールの開発でも必須かとは
おもうので、地味に進めますよ・・・。

コメントも英語だというのも自分には問題だね :p


また、基本的な所も理解出来てなくて
コールバック関数を学ぶのに

メンバ関数のポインタ渡し > メンバ関数 > クラス
関数のポインタ > ポインタ
マクロの書き方 >
呼び出し規約 > アセンブラ > CPUの構造

とかいう芋づる式に問題ががが orz
どこまで知らなくていい物かすら判断出来ないので、
微々たる進捗です・・・。

お昼休みだけでは時間が全然足りないw

2014年2月12日水曜日

2D : Photoshop : SpeedPaint : メトロイド リアル


ちょっとグロも含まれるので注意。
素材管理の鬼です。

かえる、さい、にゃんこがこんなところに

※サイが有能でびっくりw

2014年2月10日月曜日

Softimage Original Script : SetHardEdge

2014 0213 追記


SIはポリゴンの周囲をハード化する物が無い。

rcToolsのポリゴンの境界を選択 > ハードエッジ
の手間が面倒だったので、スクリプト化した。


SetHardEdge


選択したエッジ、
選択したポリゴンの境界のエッジを
ハードエッジ化するスクリプト


使用方法

ポリゴンを選択、
または、エッジを選択して実行


Coad

#edgeHard
#
#選択したポリゴンの境界線。
#選択したエッジをハードエッジにするスクリプト
#
# 2014 0209 ハードエッジの調整
#

app = Application; log = app.LogMessage
dbug = False

def dlog(in_str):
 if dbug == True:
  log(in_str)


def markHardEdge(oObj,oEdgeIndecies):
 oIDs = oEdgeIndecies
 dlog(oObj)
 oGeo = oObj.ActivePrimitive.Geometry
 oEdges = oGeo.Segments
 for i in oIDs:
  edge = oEdges[i]
  if edge.IsHard:
   dlog("oEdgeID : " +str(edge.Index) + " : " + "is Hard")
   
 nSub = oGeo.CreateSubComponent("edge",oEdgeIndecies)
  
 app.ApplyOp("MarkHardEdgeVertex", nSub, 3, "siPersistentOperation", "", 0)


#ポリゴンの境界線のエッジを取得
def getPolyUnionEdges(oSel):
 oSub = oSel.SubComponent
 oObj = oSub.Parent3DObject
 oColl = oSub.ComponentCollection
 oGeo = oObj.ActivePrimitive.Geometry
 polys = oGeo.Facets
 nbPoly = polys.Count
 log(nbPoly)
 aPolyIDs = oColl.IndexArray
 bPolyIDs = []
 for i in range(nbPoly):
  flg = False
  for aID in aPolyIDs:
   if i == aID:
    flg = True
    continue
  if flg == False:
   bPolyIDs.append(i)
  
 #dlog(str(aPolyIDs))
 #dlog(str(bPolyIDs))
 
 aEdges = []
 bEdges = []
 
 for i in aPolyIDs:
  edges = polys[i].Edges
  for eID in edges:
   aEdges.append(eID.Index)
  
  
 for i in bPolyIDs:
  edges = polys[i].Edges
  for eID in edges:
   bEdges.append(eID.Index)
  
 aSet = set(aEdges)
 bSet = set(bEdges)
 
 return list(aSet & bSet)
 

#ポリゴンの境界線を調整
def polyEdgeMark(oSel):
 oSub = oSel.SubComponent
 oObj = oSub.Parent3DObject
 oEdges = getPolyUnionEdges(oSel)
 markHardEdge(oObj,oEdges)
 

def main():

 oSels = app.Selection
 for oSel in oSels:
  #seltype
  dlog(oSel.Type)
  if oSel.Type == "polySubComponent":
   polyEdgeMark(oSel)
  
  if oSel.Type == "edgeSubComponent":
   oObj = oSel.SubComponent.Parent3DObject
   oEdges = oSel.SubComponent.ComponentCollection
   markHardEdge(oObj,oEdges.IndexArray)

main()


メモ

ことの起こりは、ハードエッジ化したエッジの、
ハードエッジのプロパティの解除が目的だった

が、SDKを確認しても、
ハードエッジの状態は取得出来るが、
解除に関しては、その記載が無かった。

WEBを調べると、ハードエッジの消去は、
そのエッジを選択、MarkHardEdgeで、
ハードエッジ化をもう一度行い
そのプロパティのチェックを外す。
という物だった orz


ハードエッジ自体は、
その性質上(オペレータスタック)
オペレーター駆動で行っているらしい。

というわけで、
解除する為にはオペレーターコマンドで
作業しないとダメっぽい。

※こんなやつ
Application.ApplyOp("MarkHardEdgeVertex", nSub, 3, "siPersistentOperation", "", 0)


ハードエッジ作業が今後も増えるようだったら、
・ハードエッジの追加
・ハードエッジの削除
・作業途中で出来た、クラスターの削除
・フリーズかを含めたツールがひつようかも。


また、ハードエッジの仕様が気になるところ。
外部ツールは頂点を増やして対応してるのか、
UserNormalで対応してるのかが、謎ね。


既知のバグ

・選択状態が解除される。
・複数のオブジェクトに対応してない(選択状態がはずれる?)


追記 2014 0213

mayaraさんが、ハードエッジを作る、削除するプラグインを
作ってた〜(ymt3Dさんに教えてもらいました

mHard Edge Marker

2014年2月4日火曜日

Softimage : Original Script : VVNormal

3年ぶりにスクリプトを修正。
動くようになったので、メモがてら公開

VVNormal : 効果


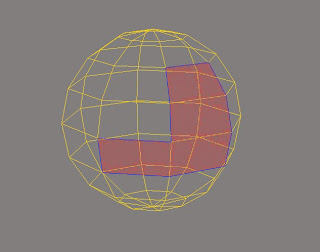
選択したコンポーネントを正面に向けるようにカメラを移動します。


Sorce


# VVNormal
#
# v0.1 2014 02 04 とりあえず、UserCameraでもOK
# v0.0 2011 06 04 Cameraには対応するもUserCameraだとNG

SIZE_RETIO = 0.4
BASE_CAMLENGTH = 50

from win32com.client import constants as c
import math
app = Application
log = app.Logmessage
debug = True

#ログの表示を消す
cmdLog = app.Dictionary.GetObject( "preferences.scripting" )
cmdLog.cmdlog.value = False


def dlog(in_value):
 if debug:
  log(in_value)


#ポリゴンのノーマルの平均を算出しノーマライズ
def getPolyAverageNormal(oColl, m3): 
 NA = oColl.NormalArray
 Nx = Ny = Nz = 0
 for i in range(len(NA[0])):
  Nx += NA[0][i]
  Ny += NA[1][i]
  Nz += NA[2][i]
 nV = XSIMath.CreateVector3(Nx,Ny,Nz)
 if nV.Length() <= 0.01:
  nV.Set(0,0,1)
 nV.NormalizeInPlace()
 nV.MulByMatrix3InPlace(m3)
 return nV


#Cameraの注視点を取得
def getCamInterestPos(oColl, m): 
 #CameraのInterestを選択したポリゴンのBBoxの中央に
 pnts = oColl.NeighborVertices(1)
 xp = []
 yp = []
 zp = []
 for pnt in pnts:
  pos = pnt.Position
  pos.MulByMatrix4InPlace(m)
  xp.append(pos.X)
  yp.append(pos.Y)
  zp.append(pos.Z)
 xplen = abs( max(xp)-min(xp) )
 yplen = abs( max(yp)-min(yp) )
 zplen = abs( max(zp)-min(zp) )
 inPos = XSIMath.CreateVector3(xplen * 0.5 + min(xp) ,yplen * 0.5 + min(yp) , zplen * 0.5 + min(zp) )
 return inPos

 
def main():
 dlog("-----main-----")
 userCam = True

 #カメラの取得
 cam = getActiveCamera()
 dlog("CamName : " + str(cam.name))
 cons = cam.Kinematics.Constraints
 log(cons.count)
 for con in cons:
  if con.Type == 'dircns':
   cameraIns = con.Constraining(0)
   userCam = False
   break;
 if app.Selection != None:
  if app.Selection(0).Type != "polySubComponent":
   dlog("PolyMode")
  elif app.Selection(0).Type != "edgeSubComponent":
   dlog("edge")
  elif app.Selection(0).Type != "pntSubComponent":
   dlog("pnt")
  else :
   return
 else:
  return

 oSel = app.Selection(0)
 oSub = oSel.SubComponent
 oObj = oSub.Parent3DObject
 oColl = oSub.ComponentCollection
 m = XSIMath.CreateMatrix4()
 m3 = XSIMath.CreateMatrix3()
 oObj.Kinematics.Global.Transform.GetMatrix4(m)
 oObj.Kinematics.Global.Transform.Rotation.GetMatrix3(m3)
 im = XSIMath.CreateMatrix4()
 im.Invert(m)
 
 #注視点を取得
 inPos = getCamInterestPos(oColl, m)
 
 #Normalを取得
 nV = getPolyAverageNormal(oColl,m3)
 
 oTrans = XSIMath.CreateTransform()
 
 #UserCamでなければ
 if userCam == False:
  cameraIns.Kinematics.Global.Transform = oTrans
  oTrans.SetTranslation(inPos)
 
 #ビューマトリクスから、Xの長さYの長さを算出
 vm = createViewMatrix(nV,inPos)
 m.MulInPlace(vm)
 pnts = oColl.NeighborVertices(1)
 xp = []
 yp = []
 for pnt in pnts:
  pos = pnt.Position
  pos.MulByMatrix4InPlace(m)
  xp.append(pos.X)
  yp.append(pos.Y)
 xLength = abs( max(xp)-min(xp) )
 yLength = abs( max(yp)-min(yp) )

 #カメラの画角より、最適な距離を算出。 inX inY in割合
 camLength = BASE_CAMLENGTH
 if xLength > 0.01 and yLength > 0.01:
  camLength = getCameraLength(cam, xLength, yLength, SIZE_RETIO)
 
 #カメラのポジションに適用
 camPos = XSIMath.CreateVector3()
 nV.ScaleInPlace( camLength )
 camPos.Add(inPos,nV)
 
 if userCam :
  dlog("UserCamera Mode")
  
  #距離の指定
  cam.interestdist.Value = camLength

  oTrans.SetTranslation(camPos)
  oRot = XSIMath.CreateRotation()
  vm.InvertInPlace()
  oTrans.SetMatrix4(vm)
  app.SetValue(cam.FullName + ".kine.global.rotx", oTrans.RotX, "")
  app.SetValue(cam.FullName + ".kine.global.roty", oTrans.RotY, "")
  app.SetValue(cam.FullName + ".kine.global.rotz", oTrans.RotZ, "")
  app.SetValue(cam.FullName + ".kine.global.posx", camPos.X, "")
  app.SetValue(cam.FullName + ".kine.global.posy", camPos.Y, "")
  app.SetValue(cam.FullName + ".kine.global.posz", camPos.Z, "")

 else :
  dlog("CameraMode : Moved")
  oTrans.SetTranslation(camPos)
  cam.Kinematics.Global.Transform = oTrans
  
 dlog("-----finish-----")
 
 return
 
#アクティブなカメラを取得
def getActiveCamera():
 oL = app.DeskTop.ActiveLayOut
 
 #デフォルトビューのチェック
 oV = oL.views("vm")
 abcd = oV.GetAttributeValue("viewportundermouse")
 if oV.Views(abcd).Type == 'Viewer':
  ActiveView = oV.GetAttributeValue("activecamera:" + abcd)
  log(ActiveView)
  if (ActiveView =="User") or (ActiveView =="Top") or (ActiveView =="Front") or (ActiveView =="Right"):
   cam = app.GetValue("Views.View" + abcd + "." + ActiveView + "Camera")
  else:
   cam = app.GetValue(ActiveView)

 #ビューマネージャーにある、オブジェクトビューのチェック 
 num = 0
 for i in range(4):
  if oV.Views(i).Type == 'Object View':
   num += 1
 log("ObjectViewCount : " + str(num))  
 if oV.Views(abcd).Type == 'Object View':
  ActiveView = oV.Views(abcd).GetAttributeValue("Camera")
  ViewName = oV.Views(abcd).FullName
  log(ActiveView)
  log(ViewName)
  if ActiveView == "default":
   cam = app.GetValue("Views.View" + str(num) + ".UserCamera")
  else:
   cam = app.GetValue(ActiveView)
   
 #フローティングのオブジェクトビューの対応 
 for x in oL.Views:
  if x.Type == 'Object View':
   log(x)
   ActiveView = x.GetAttributeValue("Camera")
   if ActiveView == "default":
    cam = app.GetValue("Views.View" + str(num) + ".UserCamera")
   else:
    cam = app.GetValue(ActiveView)
 return cam
 
#画角と長さより焦点からのカメラの距離を算出
def getCameraLength(inCamera, inX, inY, inPercnet):
 cam = inCamera
 x = inX
 y = inY
 aspect = cam.aspect.Value
 fov = cam.fov.Value
 fovtype = cam.fovtype.Value #if 1:Horizontal
 
 fov = XSIMath.DegreesToRadians(fov)
  
 #Xでの算出
 xCos =  ( 0.5 * x ) / math.tan( 0.5 * fov ) 
 #Yでの算出
 yCos = ( 0.5 * y ) / math.tan( 0.5 * fov ) * aspect
 
 if xCos > yCos:
  length = xCos
 else:
  length = yCos
  
 length = length / inPercnet
 return length

#ビューマトリックスの作成 
def createViewMatrix(inNormalVect,inInsPos):
 nv = inNormalVect
 m = XSIMath.CreateMatrix4()
 upv = XSIMath.CreateVector3(0,1,0)
 if nv.Dot(upv) > 0.9:
  m.Set(1,0,0,0,   0,0,-1,0, 0,-1,0,0, inInsPos.X, inInsPos.Y , inInsPos.Z , 1)
  m.InvertInPlace()
  return m
 u = XSIMath.CreateVector3()
 v = XSIMath.CreateVector3()
 w = XSIMath.CreateVector3()

 w.Scale(-1 , nv)
 w.NormalizeInPlace()
 
 u.Cross(upv,w)
 u.NormalizeInPlace()
 
 v.Cross(u,w)
 v.NormalizeInPlace()
 
 m.Set(
 u.X , u.Y , u.Z , 0 ,
 v.X , v.Y , v.Z , 0 ,
 w.X , w.Y , w.Z , 0 ,
 inInsPos.X, inInsPos.Y , inInsPos.Z , 1
 )
 m.InvertInPlace()
 return m
 
main()


備考

Softimageは、自分で制作するカメラと、
シーンにあらかじめ配置してあるビュー用のカメラがあります。

ビュー用のカメラは、注視点ようのNullがなかったので、
場合分けが出来てなかったですが。
改良して使えるようにしてみました。

付け焼き刃的に拡張したので、
中身はUNKです orz